Way back when (in the spring of 2021), I was a student in my final year of my Bachelor's degree, wherein I had to do a Bachelor's project.
This project, which I took up mainly because I had to, was on a topic proposed by Laurent Moccozet, one of my professors, mainly due to the fact I was unmotivated to come up with a fun project idea.
In essentia, it revolved around the visualisation of Dominant Language Constellations, which are the focus of a number of academic works authored by Larissa Aronin:
- L. Aronin, "Multi-competence and Dominant Language Constellation" in The Cambridge Handbook of Linguistic Multi-Competence, 2016, doi: 10.1017/CBO9781107425965.007
- L. Aronin, "Dominant Language Constellations In Education, Language Teaching And Multilingualism", 2018, [online]: Personal website
- J. Bianco and L. Aronin, "Introduction: The Dominant Language Constellations: A New Perspective on Multilingualism", 2020, doi: 10.1007/978-3-030-52336-7_1
The tool was created as part of an academic collaboration between Larissa Aronin and Laurent Moccozet, a lecturer and researcher at the University of Geneva, and myself.
This blog post explains how it was developed and goes into some of the meatier technical details.
Summary
- The "Research Problem"
- Representation questions
- Initial implementation
- Problems
- Revamped implementation
- Final project
The "Research Problem"
The first questions you may be asking are "well, what exactly is a Dominant Language Constellation?", and "why is it important?".
To the former, I can answer by saying that a Dominant Language Constellation (or DLC) is a "snapshot" representation of the languages a person knows, augmented with a quantification of their perception of the distance between these languages.
Explained differently, it is a snapshot of a person's vehicle linguistic abilities at a given time.
The latter question is then answered by stating that this perceived distance has ties to factors influenced by a person's context (as it may change over time), leading to shifts in globalization and of superdiversity, but also of geography, society, work, and community, pointing to an interconnectedness of global and local contexts, which is a phenomenon named after the contraction of the words globalization and localization: glocalization.
The main issue arises when you attempt to represent a DLC, which researchers had taken to doing with sticks and papier-maché balls:
 The initial DLC modelization method.
Although this method enables a tangible representation of the DLC, it does not allow one to systematically compare DLCs, nor does it allow for large studies without a significant amount of organization.
Due to the potential n-dimensionality of a DLC, representing it as a 2D render on a computer is also not very practical (see below), because the notions of depth and interactability are lost.
 A potential 3D computer representation of a DLC
To summarize, this project needed an accessible way to visualize and compare DLCs, which can be interacted with and present the notion of depth (ie. 3D representation).
On the technical side, this means that we need an interface (preferably in a browser) that has the ability to display data collected from any respondent to the experiment, implying that it is stored in a database of some kind.
Representation questions
Before getting into specific technologies, I needed to consider the various use cases (diagram below), how the information would be collected, what would be an efficient way to represent it as information, and how the various services would communicate.
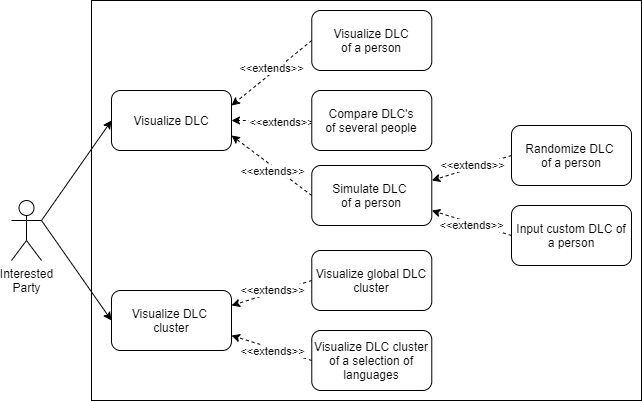 The use cases diagram for this project.
For simplicity, we opted to collect information via Google Forms, which is a bit iffy from a privacy perspective, but due to the information collected we were told did not constitute a problem.
- Respondent Details:
- Age
- Gender
- Nationality
- Country of Residence
- Level of Education
- Languages spoken:
- Language name and spoken dialect
- Proficiency
- Familiarity
- Self-assessed linguistic "distance"
We could then move on to conceiving and implementing this service.
Initial implementation
Since we now had data from 51 respondents, I had to figure out how one would effectively be able to exploit the relationships between the two node types that were available to me (Person and Language).
Thankfully, I had recently seen graph databases in a class, and decided that using Neo4j would be an interesting experiment.
Database
So I came up with a database schema that would make use of the graph-type relationships that were available:
 Initial representation of the database model.
Here, a Person has a relationship called :KNOWS_LANGUAGE with a Language. Additionally, two Language nodes have a relationship specifically with relation to a Person, which is called :HAS_DISTANCE.
The following representation is not really "standard" but you can see two beings (Blue and Green) which know a number of different languages, and the relationship between these languages that carries the "distance" is also color-coded Blue or Green depending on whom the relationship references.
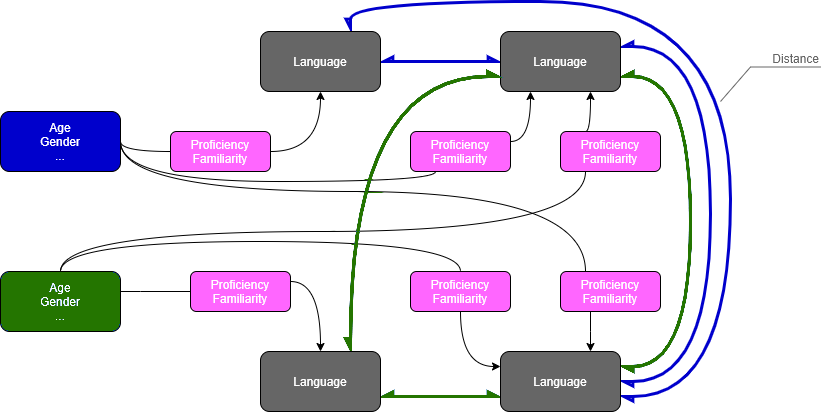 A schematic diagram representing the being-language relationship.
Since our form produced a CSV file, we first had to convert the CSV into a series of Cypher queries, which would be done using a Python script. (Cypher being the language used to query Neo4j)
If you really want to take a look at the (ugly) Python script, you can check it out here: extractor.py.
The Cypher output then looks like below, and can be injected into a Neo4j database using the web-interface or a CLI interface such as cycli.
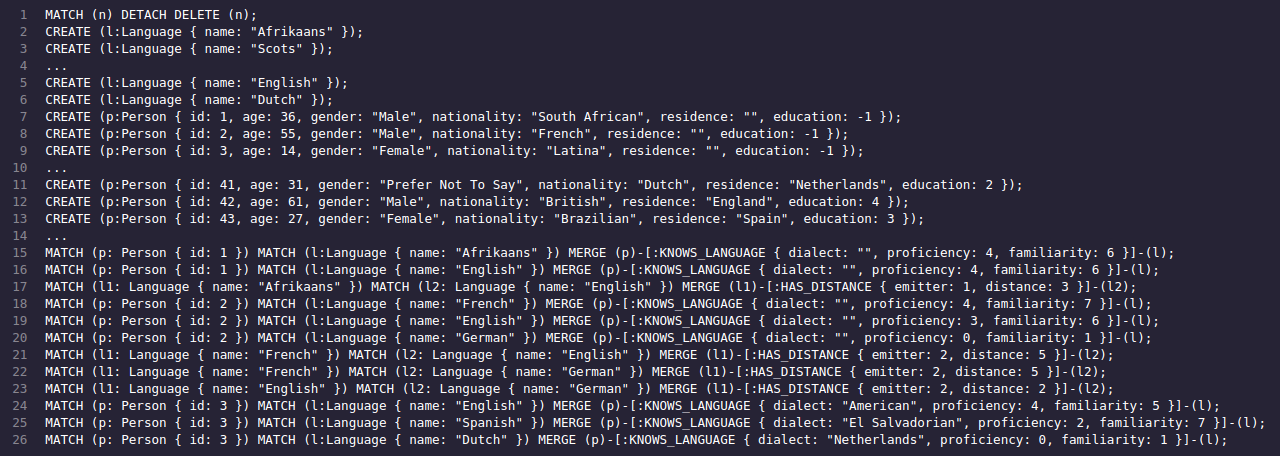 The Cypher input for the Neo4j database.
This in turn produces a database which is represented like such:
 The database, in Neo4j
Backend
Now that we had a database, I could write the backend in Node.js and express, simply because a database connector existed for Neo4j in that environment, and it is quite easy to write a passthru API in it.
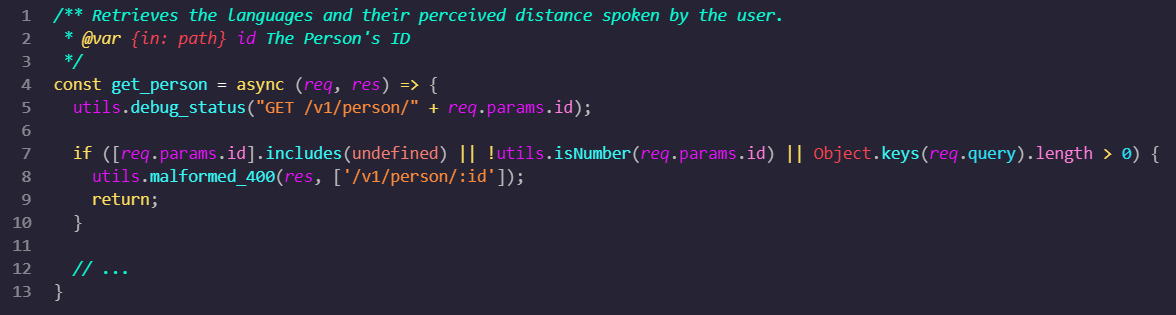 An express API endpoint.
Frontend
With a database, a backend, and time pressing, I then started building the frontend in Angular.
This brought me to the main question: How does one represent a 3D model in a browser and have the ability to interact with it?
The answer, as it turns out, was force graphs! The main reason being that the force dynamics settle, allowing for the "closest" possible match to the expected model.
And thankfully, a fork of d3 exists to do exactly this: d3-force-3d.
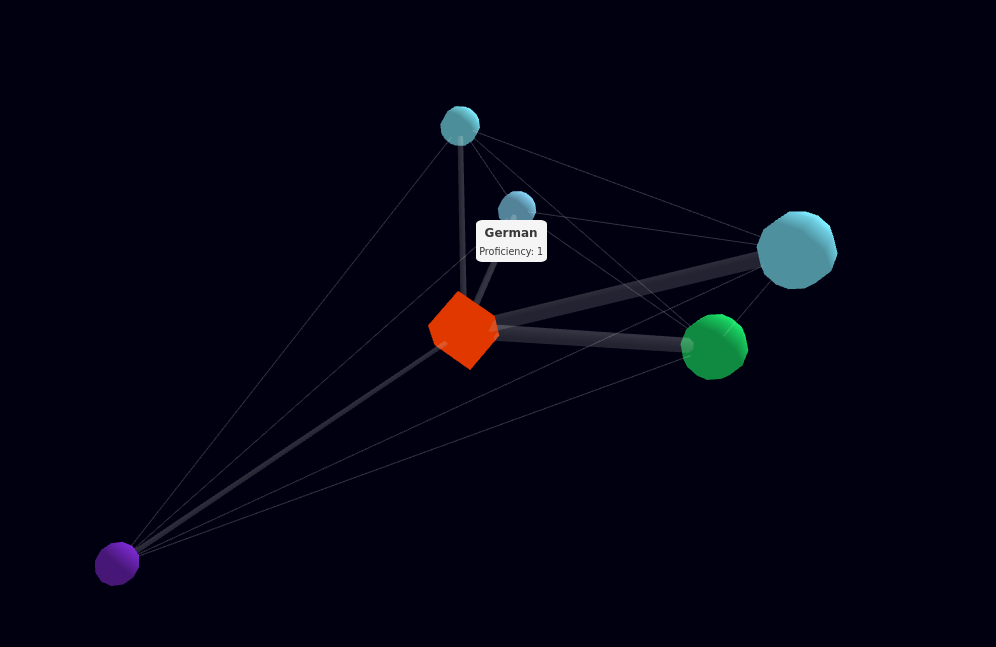 A 3D force graph of a DLC.
Now all that remained was to make these graphs react based on provided input, and display it to the user:
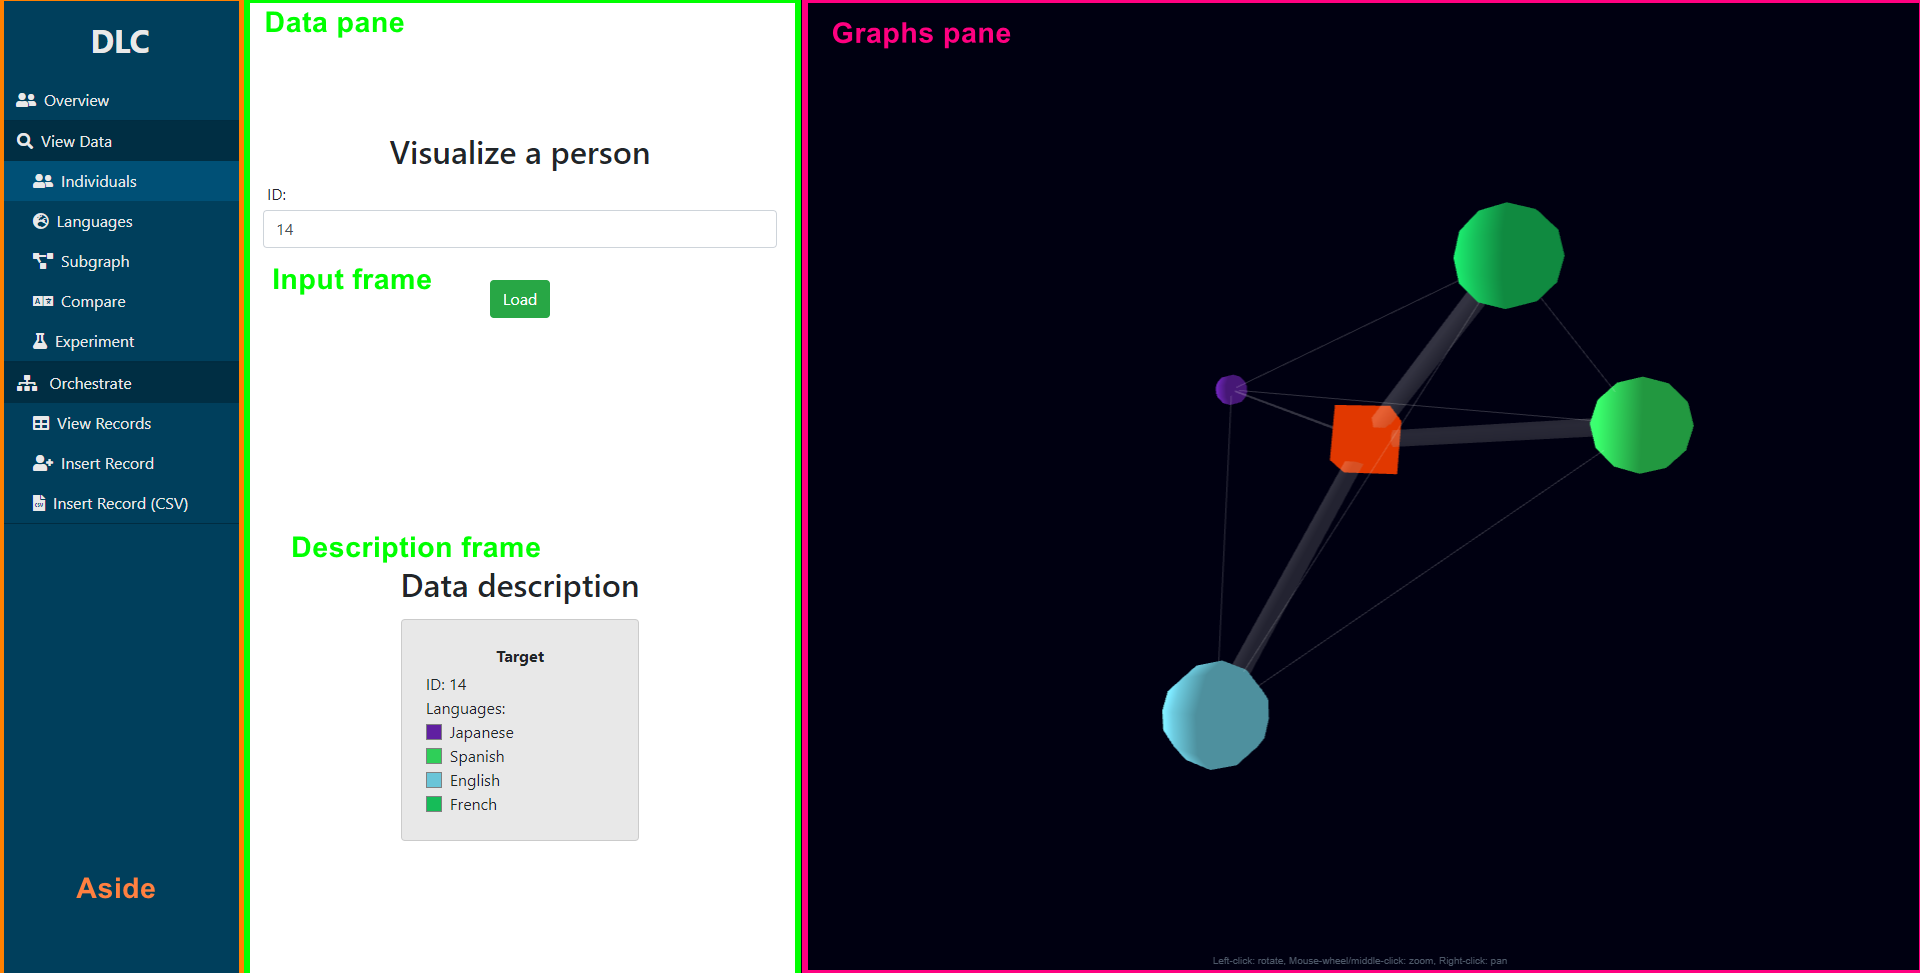 The main UI.
Here, the aside allows one to access the various functionalities, the data pane provides the ability to comprehend the raw data, and the graphs pane provides the ability to interact with the rendered model.
A few features were devised, namely visualizing a single DLC (above), a comparative DLC (below - first), a self-design interface, or the overall DLC cluster (below - second) (or a sub-cluster thereof, below - third).
What is a DLC cluster? Well it is the averaged DLC of every single respondent, and the sub-cluster only focuses on the languages that connect to a set of specified languages.
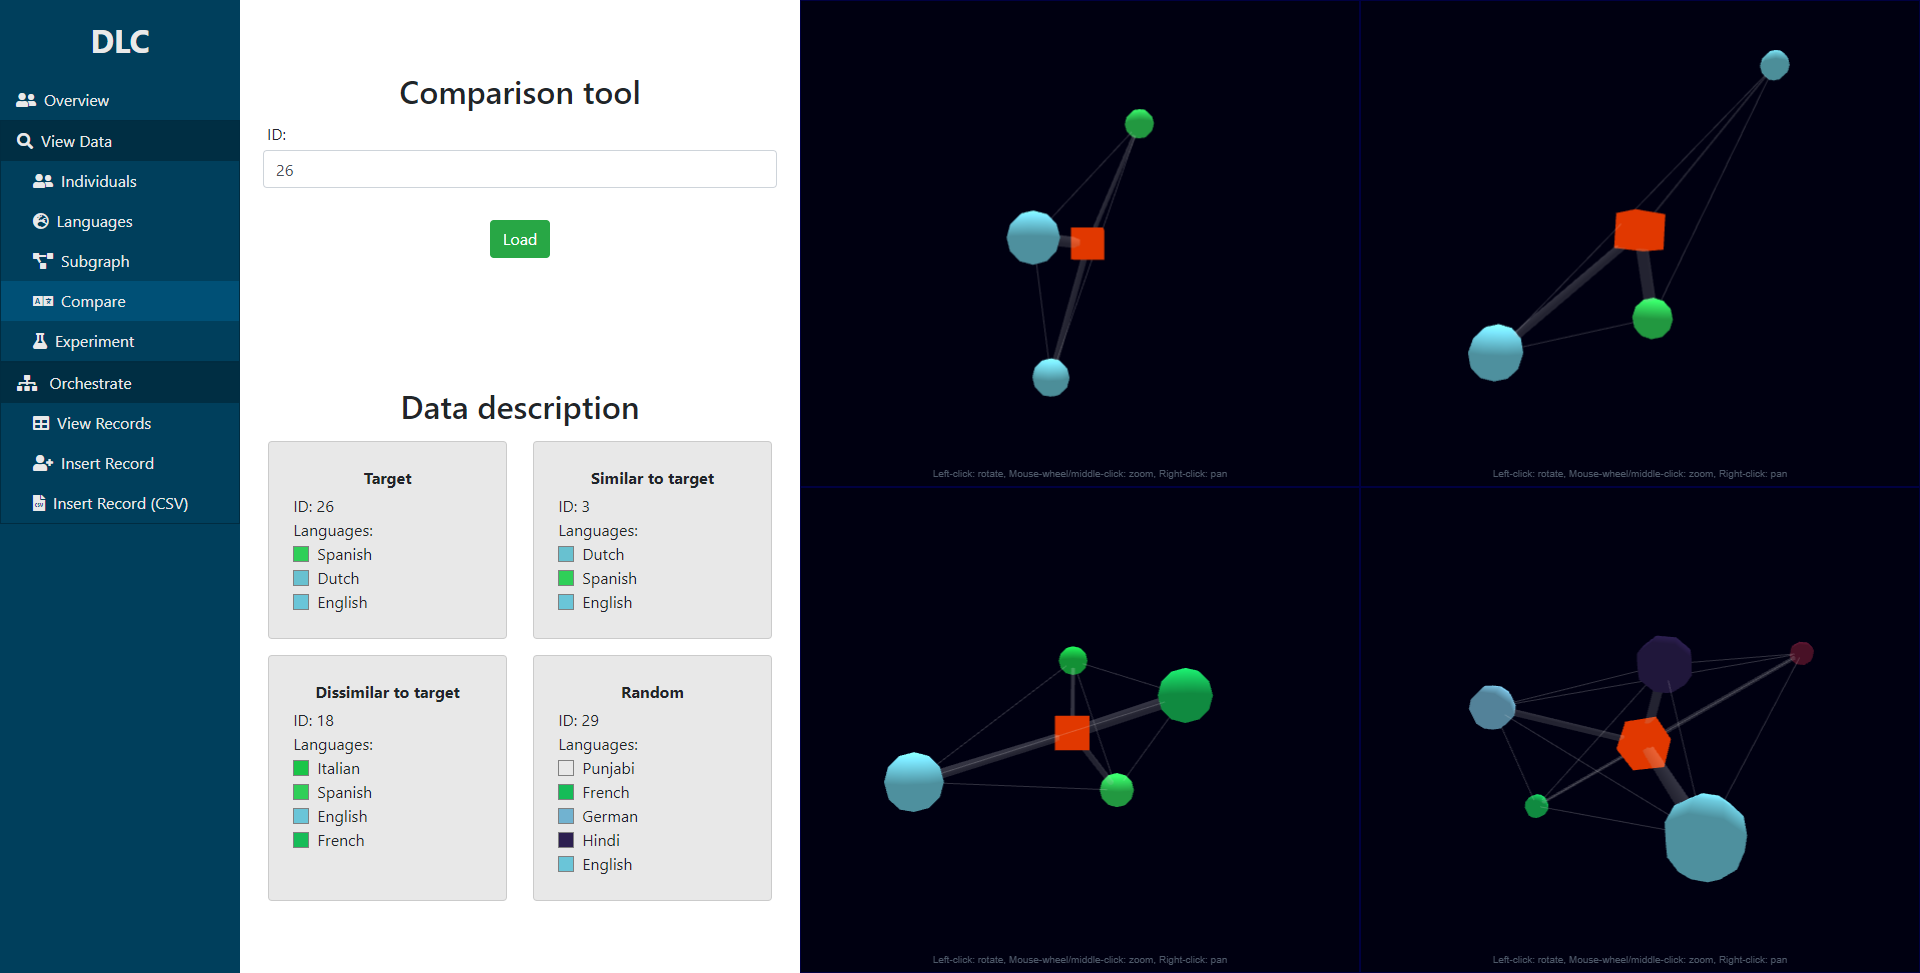 The comparison UI.
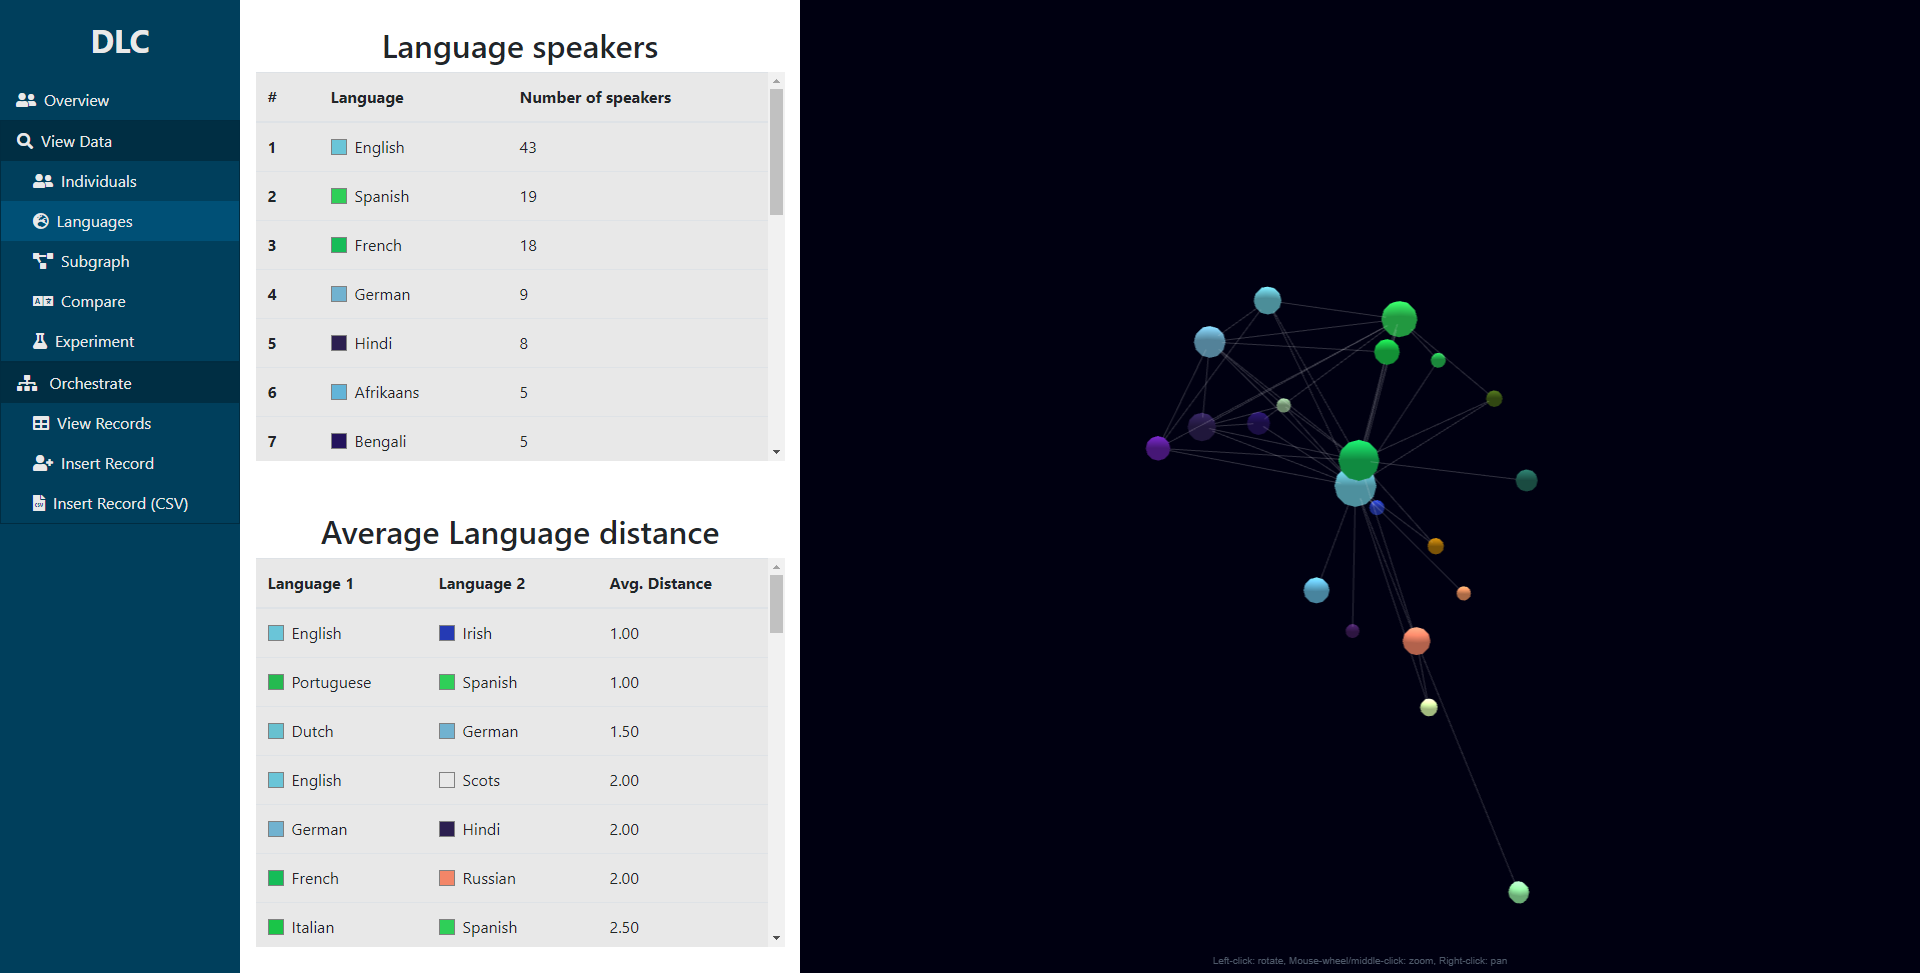 The cluster UI.
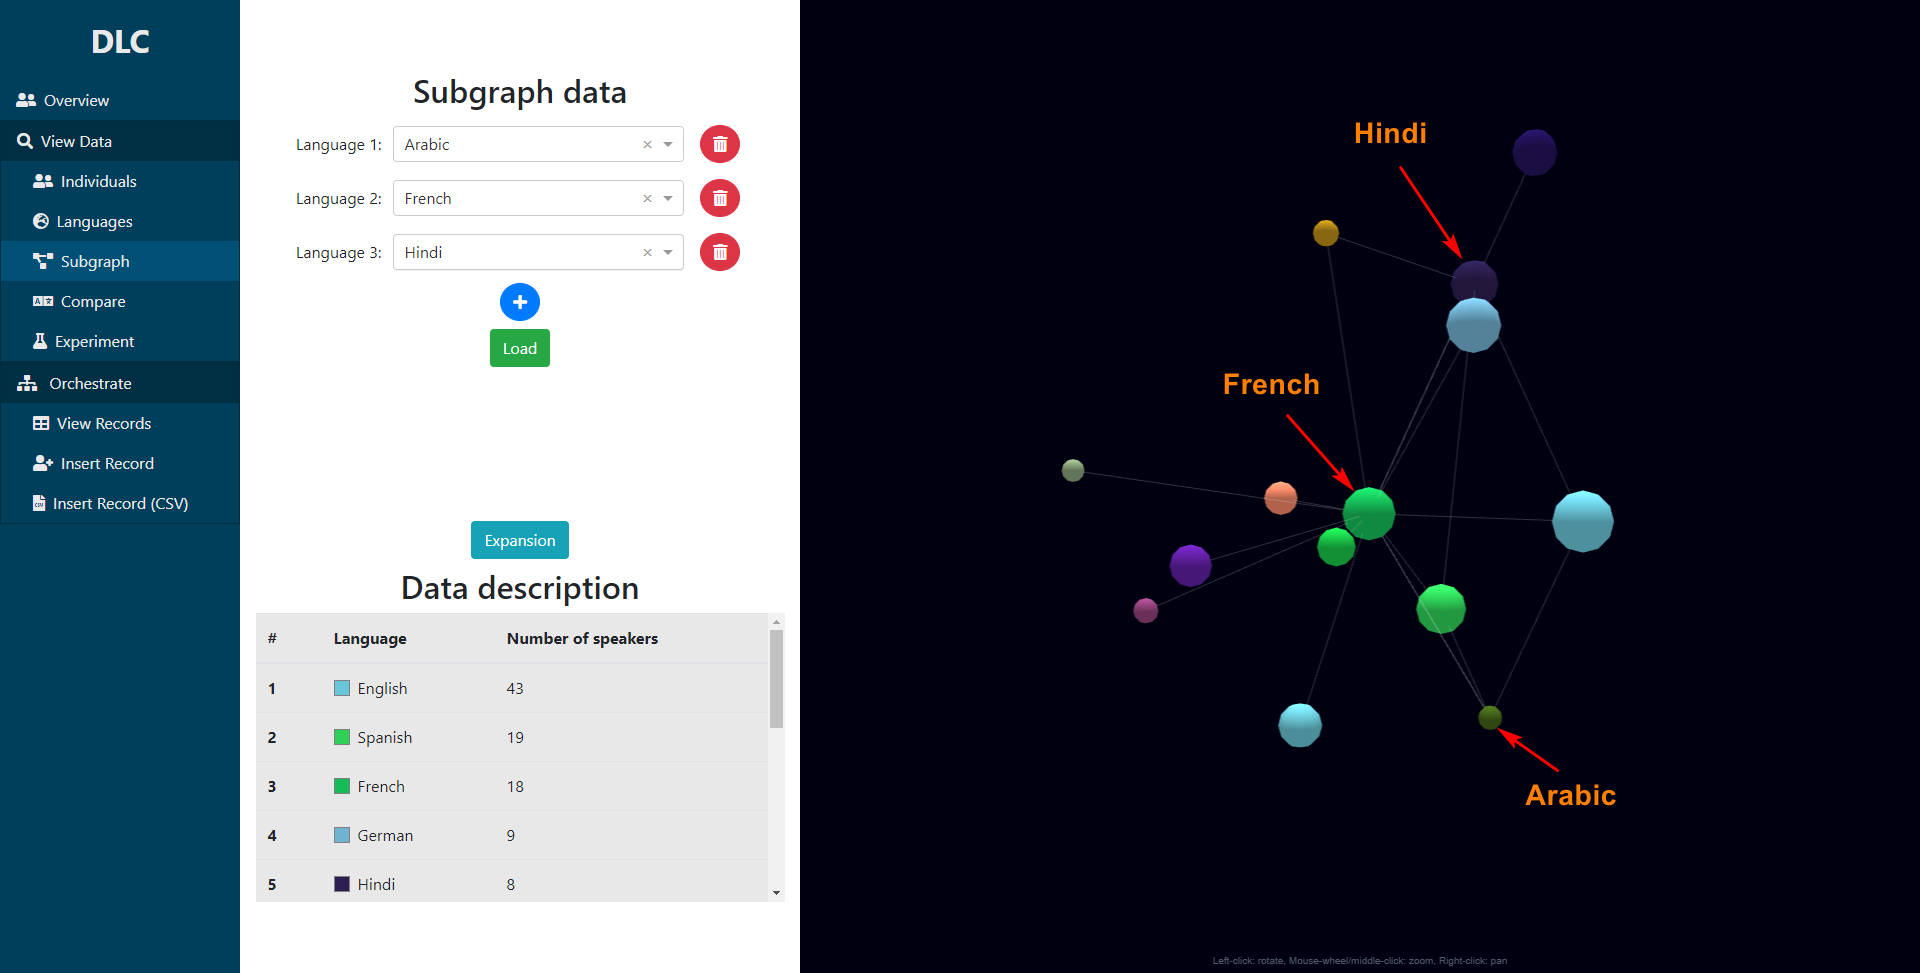 The subgraph UI.
Problems
At this time, I had then presented my work and received my grade, after which the project may or may not have lain dormant for 1.5 years during which I did my M. Sc.
After defending my M. Sc. thesis (see the related blogpost), and considering the overall study was still active, I decided to hand over the project to Laurent Moccozet.
However this means a few things needed to be fixed, namely:
- The ability for Laurent to be able to add datasets;
- The ability for users to switch datasets and see more information on the service page;
- Using a faster database because of lag on certain requests (Neo4j is Java, after all);
- Switching the API to something less finicky than raw Node.js and Express;
- Having a form of deployment architecture for it to be deployed at the University of Geneva.
Revamped implementation
Database
The first thing that I dealt with was attempting to find a competitor for Neo4j that also featured graphs with a similar query language, but in the end was also faster.
This led me to ArangoDB, which uses aql for queries, is graph-based, but most importanly is written in C++ with the interaction layer being written in JavaScript.
This however meant I needed to rewrite the extractor, to convert to aql instead of Cypher, and I also took the liberty to make the output dataset dependent, so more than one dataset can exist concurrently on the service with no collisions and minimal issues to usability.
If you (again) really want to take a look at the (ugly) Python script, you can check it out here: extractorarango.py.
This file, instead of generating one massive Cypher query, builds up the database structure and segments it into CSV files representing the various collections and relationships, hence there being a people-DATASETNAME.csv, a knowsLanguage-DATASETNAME.csv, etc.
The CSV files contain specific headers that specify nodes (_key) or relationships (_from and _to), with any other columns specifying other attributes of said nodes or relationships.
Backend
I also ended up rewriting the backend in Loopback, a TypeScript "wrapper" around Express and Node.js, which functions a lot like FastAPI does for Python.
I also added the ability to filter by specified dataset, which would enable the API to only respond in the scope of the users request currently selected dataset.
Frontend
The frontend is the aspect which required the most tweaking and time, but not really from a technical perspective.
It simply required some additional content, as well as to fix a few CSS issues that were messing up the styling in certain conditions.
In the aside, I added the dataset switcher, which is simply a dropdown to select a different dataset leading to the dataset to be updated.
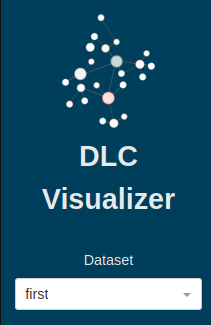 A new logo, and the ability to select datasets.
Since all of the content requires an initial communication to reach the database, there is now a small loading screen, which was not necessary per se, but was nice to add.
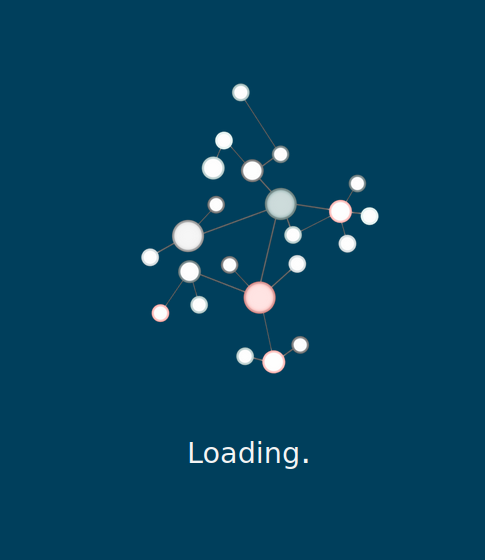 The loading page, whilst the dataset is being loaded.
I then also added an information page which presents the project for readers, and an overview page which shows a number of statistics related to the currently selected dataset.
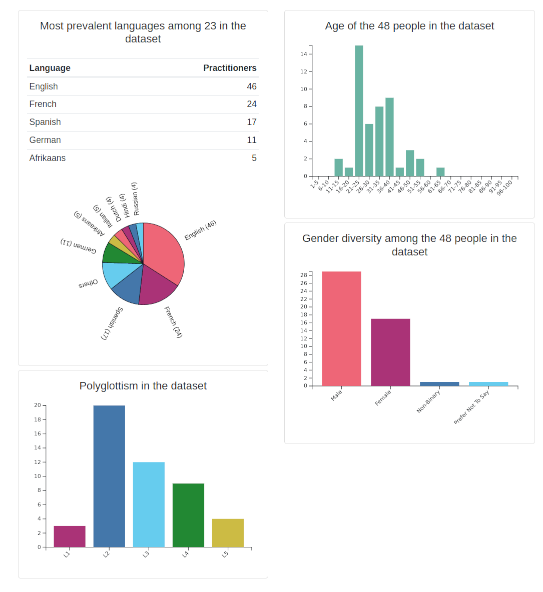 A few handy graphs
Architecture and Deployment
After all of these different bits were solved, I could move on to the deployment of the application.
Because I enjoy having the ability to replicate things and I absolutely hate developing on barebones infrastructure, I set out to have a Docker deployment of the entire application.
This led me to initially set up a few containers for the database, the database's persistence, the backend and the frontend.
Database
The database container was most confusing to set up, specifically because it deals with pre-populated data generated by our Python script.
The first step was to create our Dockerfile:
The commands.sh file contains the following, which allows the arangod (ArangoDB daemon) to start before trying to insert the database contents.
The arango.docker-init.sh file is where things get a little... funky.
As you can see below, it first checks whether or not it has been run (based on the persistence volume)
If the script has not yet been run, it uses arangosh (the arango shell) to execute a JavaScript file.
It then loops over all of the CSV files generated by extractorarango.py (described above), and raw imports the collection based on the file name.
The /tmp/arangodb.docker-init.js (referenced above) sets up the credentials to be used and the initial database, based on the environment variables defined in the docker-compose.yaml file shown below.
After *waves* all of *that*, we simply specify the database and persistence containers in the docker-compose.yaml file, which is below but collapsed due to its length.
Backend
The backend itself is much simpler to build and setup, and simply relies on the following Dockerfile.
We then link the container in the docker-compose.yaml:
Frontend
The frontend is *even simpler* to deal with, since it is built using Angular, one simply needs to generate a production build and throw that into a directory to be served by the server.
The Dockerfile then looks like this:
The nginx.conf file is simply in charge of serving content on port 80:
We then link the container in the docker-compose.yaml:
Linking the bits
So we now have a database, an API that can talk to it and a frontend.
But if you have been paying attention, you may have noticed that the frontend and the backend cannot talk to one another, which may seem counterproductive.
The reason for this, is that I have time and time again run into issues with CORS policies (Cross-Origin Resource Sharing) even on services hosted on the same server.
(And most people that have ever done projects like this have strong opinions on CORS, source: trust me)
And since I hate CORS issues, the easiest way I have found to deal with all of this is simply to slap an NGINX proxy in front of it all, with /URI pointing to the frontend, and /api/URI pointing to the API.
Same origin, same resource, no CORS issues, bliss.
So we have yet another Dockerfile:
And yet another nginx.conf file below.
The core aspects are that it configures the upstreams to point to the frontend and backend and their ports using the Docker DNS hosts resolution (CONTAINER_HOSTNAME:PORT), provides the .acme-challenge for all of the SSL purposes, and redirects to the https website, which, since this is done at the proxy level, won't hinder our accessing the API (because the routing is post SSL!).
"Wait a minute!", you may be asking, "what's all this SSL stuff doing there? We haven't talked about that yet!"
You are correct!
As it turns out, the container I set up with the Dockerfile has volumes tacked on by docker-compose that originate from another container that is the certbot container, which allows us to request SSL certifications issued by Let's Encrypt.
We then link the containers in the docker-compose.yaml:
At the end, our architecture looks like this:
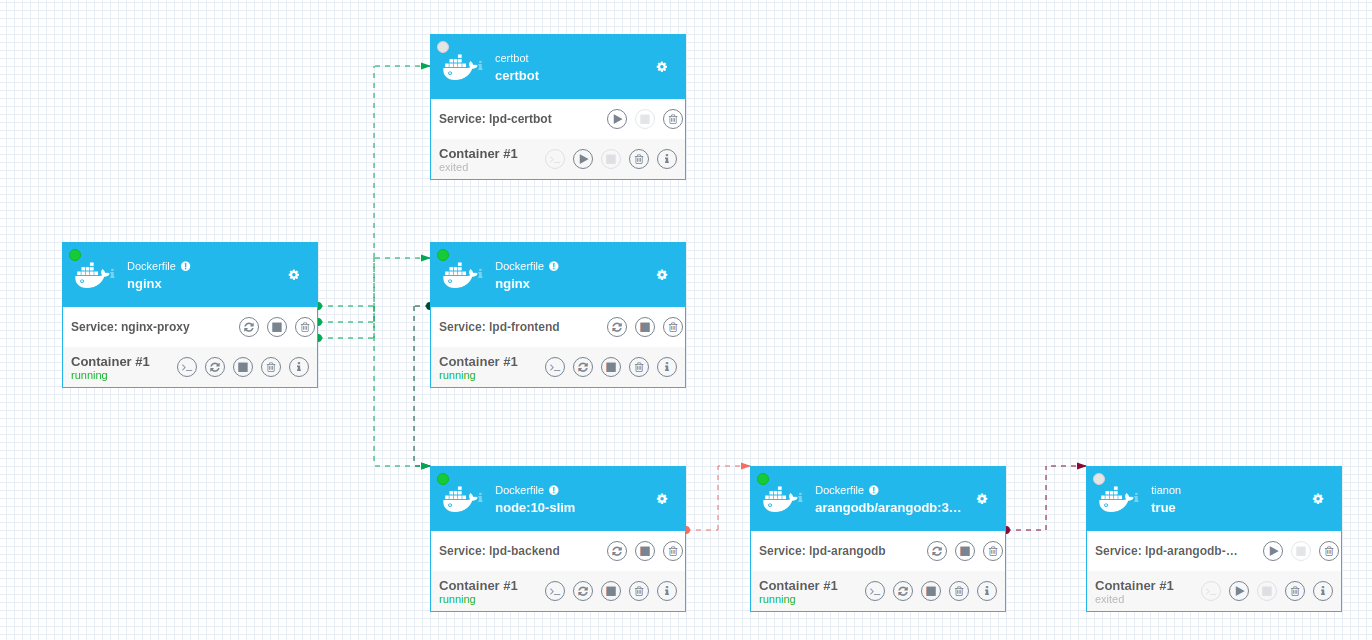 We love containers, I swear.
So we now have an entire bunch of services that all work magically. My only remaining issue is the ArangoDB instance is still accessible from the outside on port 8529, which I typically consider to be a bad thing.
Thankfully, iptables, despite being a pain to not break in eldritch manners, is quite useful for this:
Final project
Currently, due to a number of small failures in trying to get an SSL certificate again, the service is only available as HTTP.
Despite this, feel free to play around with it: http://glossastra.unige.ch (on a computer or tablet... not a phone).


